Teensy development
Paul here, Teensy developer. Obviously my opinion about whether you should use a Teensy is biased, but in terms of technical accuracy, well, I do know the details!
First, Teensy definitely does work with the Arduino IDE when you install the Teensyduino add-on package. There is a very easy-to-use an automated installer. Then you can just choose Teensy from the Tools->Boards menu.
Definitely if you are looking to interface a serial device, like a GPS with NEMA 0183 output, a PLC with Modbus, or any number of other serial devices, Teensy is much easier than Arduino with the '168 or '328 chip.
Arduino uses the serial port for downloading code. You need the RXD and TXD pins connected to the FTDI USB-serial converter chip on the Arduino, at least while you're loading new code. So your first issue is how your device will drive the RXD pin and not conflict. You can, for example, modify the Arduino with a DPDT toggle switch, so you can flip the RXD/TXD signals between the USB-serial converter and your device. Then you have to flip the switch every time, unless you come up with something more automated. There are other approaches, but fundamentally, the Arudino uses the serial port, so if you want to use it too, you have to go to some effort to somehow share.
With Teensy, there is a direct USB port that is used for all development. You can directly connect to the Teensy's serial RXD/TXD because it's not used for anything else. You use the serial port in the same functions (begin, available, read, write), but you do have to add one line to define the name you want. This page has the details:
http://www.pjrc.com/teensy/td_uart.html
While your program is running, you can use Serial.print(), which will print through the USB to to the Arduino Serial Monitor. It works just like Serial.print(), except it's much faster at full USB speed than Arduino's serial which has a 115.2 kbps maximum. The USB is also double buffered, so a typical call to Serial.print() will return control to your program very quickly, whereas Arduino waits (the serial port does buffer 2 bytes).
The Teensy has real USB, which in theory can implement almost any type of device. In practice, with Teensyduino you're limited to the types provided in the Tools->Boards menu. Currently, the choice is either USB Serial (which gives you something almost exactly like Arduino, but much faster), or USB Keyboard/Mouse. Both support Serial.print() to the Serial Monitor. With keyboard/mouse, the Teensy becomes a keyboard and mouse while it's running your program. You can type with Keyboard.print() (caution: save your work first!) and use funtions like Mouse.move(x, y). Other device types are planned.
One way the Teensy differs from Arudino is the USB changes every time you load new code and reboot (Arduino always appears as a USB-serial chip). Teensyduino tries very hard to give you an experience very close to a real Arduino. However, there is no physical reset signal (Arduino uses the DTR signal from its USB-serial chip). Auto-reset is emulated in software, so in most cases you can just click the upload button. But if it's not running previously-loaded code or it crashed with interrupts disabled, you do have to physically press the reset button on the Teensy (much like the older Arduinos before auto-reset was added). A message tells you if you need to push the button.
If you are planning to reuse existing Arduino code, in most cases it works great on the Teensy. Especially if that code uses the Arduino (wiring) functions like pinMode, digitalWrite, etc, it will almost certainly work. The Teensy has a very similar set of AVR timers and peripherals, so most code that directly accesses the hardware works with little or no modification. However, some Arduino programs (and even some poorly designed libraries) hard-code assumptions, for example, the RXD and TXD pins corresponding to Arduino pins 0 and 1. If you're planning to re-use code or use certain libraries, it's worth checking.
Teensy does not really work below 2.5 volts, and the USB can't work with less than 3 volts. It can be powered externally by simply applying power to the pins, but that power must be regulated.
I've tried hard not to make this into a sales pitch. I hope you'll consider the technical details and make the choice that's best for your project.
I have not used the Teensy hardware. That said, from the specifications, it looks like a nicely designed piece of hardware. The Teensy developers have done their own comparison with the Arduino, from which I'll quote:
Teensy uses a similar Atmel AVR processor as the Arduino board, but there are differences. The most important is direct, built-in USB on the Teensy compared to serial converted to USB by a separate chip on the Arduino. Teensy communications MUCH faster than Arduino. Starting with Teensyduino 0.6, Teensy can communicate as a USB keyboard and mouse, which is impossible with an Arduino board that has a fixed USB to serial converter chip.
Teensy is designed for easy use on breadboards in the smallest possible size, which is incompatible with the form-factor used by Arduino shields.
While many types of sketches can run, Teensy is NOT an "Arduino clone" due to the substantial technical differences. The Teensy hardware and Teensyduino software add-on are NOT endorsed or supported by the Arduino developer team.
Here are some other advantages that the Arduino has over the Teensy:
- Standalone operation: The Teensy can only be powered by the USB port. Therefore whatever you build around it will need to be plugged into a USB port (and most likely, a computer); if you want/need more power, you'll have to design and build your own power circuits. Arduinos offer many power options (USB, battery, wall-wart, etc) on-board.
- Easier Development Tools: Out of the box, both the Teensy and Arduino depend upon GCC and AVR-Libc. Arduino then adds the Arduino IDE, sketches, and other libraries that make getting started faster and simpler. (You can use those tools to develop with Teensy, but they aren't supported and have limitations).
- Standardized physical form-factor: The consistent Arduino form-factor allows people to develop processor and extension boards (shields) that can be shared and reused. You can see lists of those boards here, here, and here. Those lists are necessarily incomplete, because there are developers actively developing new boards continuously. Even the Arduino Mega can use shields designed for the earliest Arduinos. Different versions of Teensy use different physical forms and pinouts.
- Open development model: All of the Arduino hardware, firmware, and software are available with Open licenses that allow you to modify, enhance, and distribute your changes without fear of legal reprisals. Teensy does not offer the same protections.
- Community: There are LOTS of Arduino developers, along with websites, tutorials, books, kits, etc.
On the other hand, don't let all of that discourage your from using the Teensy if it meets your needs -- the Teensy platform looks well-designed for many applications where the Arduino would be too large or bulky.
Do you know if it is possible to rig these to work at lower voltages? 2.8, 1.8?
Update:
as suggested in this thread the USB part of the device will not work under 3v. I spoke with paul after ordering a couple of these. The standard Teensy has a location on the bottom to add a 3.3v regulator. On the Teensy++ (lot more i/o pins) Paul suggests I either follow the + and - lines from the USB to install a voltage regulator or I can try to splice a USB cable and add voltage regulation. To simplify matters in the future they will release a version of Teensy++ that has the spot to install a 3.3v regulator. My plan of action (for the next day or two) is to try to splice a cable. I will program the device with a normal 5v cable and then power it with a 3.3v cable for opperation. To others, my suggestion is that if you need 3.3v and do NOT need 38 i/o pins, get the standard Teensy.
Modification:
This picture shows how to manually modify the Teensy++ ver 1.0 board to install a voltage regulator and jumper so that it can be switched between 5V and 3.3v.
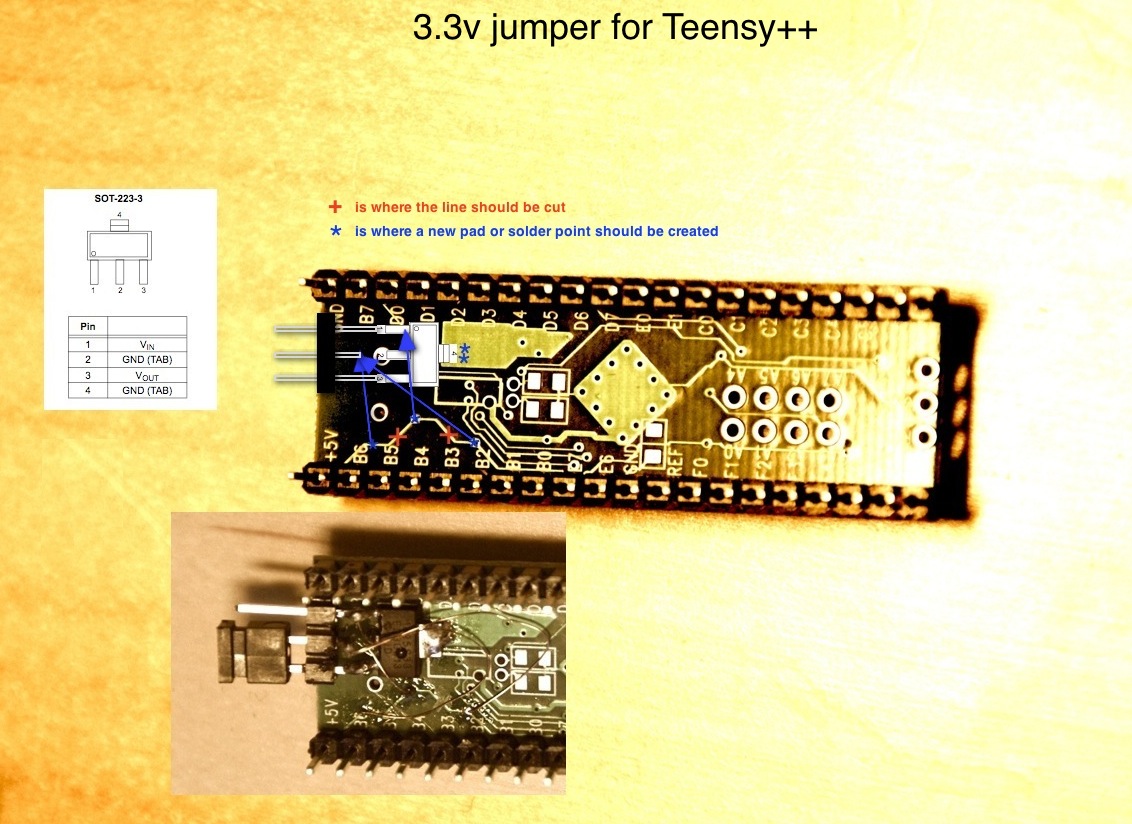 (full size or see flickr for embedded notes)